
If you’ve got a snake plant, you’ve likely seen a new shoot rising out of the soil! These are snake plant pups, and are a clear sign that your snake plant is thriving. But what exactly are snake plant pups, and why do they appear? More importantly, how can you separate these pups from the mother plant to propagate more snake plants?
*This post may include affiliate links. When you purchase items from these links, we will receive a small commission, at no extra cost to you, to help support this website. Thank you for your support! Read more ->
Keep reading to find out all about snake plant pups and how to carefully detach them from the parent plant for successful propagation into their own thriving Sansevieria!
What Are Snake Plant Pups?
Snake plant pups are a form of reproduction for the snake plant, also known as Sansevieria or Dracaena.
These pups are new plant shoots that grow from the base of the mother plant. They’re a clone of the parent plant, carrying the same genetic material. Snake plant pups are often seen peeking through the soil near the base of the mother snake plant.
Rhizomes
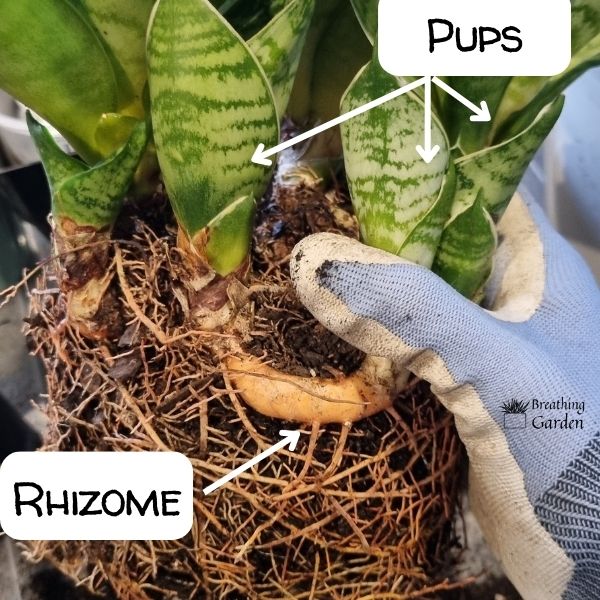
The existence of snake plant pups is due to a special organ in the plant called a rhizome. Rhizomes are like stems that run horizontally underground. They keep plant nutrients and energy stored, and that’s where the new shoots or pups come from.
As the plant grows, the rhizomes extend out and up pops a pup! This is the snake plant’s way of spreading and occupying more space. It’s a survival strategy that enables the plant to propagate even in harsh conditions.
(Ginger is a great example of a rhizome you’ve probably seen a ton of times, as this is the part we mostly eat of the plant).
How To Separate Snake Plant Pups
Once the snake plant pups have sprouted and grown to a good size, you can separate them from the mother plant! This process is not difficult, but it does require some care and attention to ensure that both plants remain healthy and thrive after propagation.
The best time to remove snake plant pups is in early spring when the growth rate of the plants is at its peak. The pups should be large enough to separate from the mother plant without damaging either of them.
Division Propagation
This method of removing a pup from the mother plant is called division propagation. It’s by far the easiest and most successful way to propagate snake plants. These rhizomes will already have the nutrients needed for the plant to survive and established roots. Much easier than something like leaf-cutting propagation!
(Find an example of leaf propagation with Jade plants)
Why Separate Snake Plant Pups?
There are several reasons why you may want to separate pups from the main snake plant. The most common reason is to give the main plant more space and resources to survive. Overcrowding will stunt the growth of the established plant and any new pups by not being able to get enough nutrients.
(If you can’t see soil around any of the top of the pot, it’s probably time to take some of the plant pups out or repot your plant to a larger space.)
Also, it’s an excellent way to expand your plant collection or share them with fellow plant lovers. By carefully separating and repotting the pups, you can create new snake plants at no additional cost!
With all of that in mind, let’s look into how to separate these snake plant pups from the main plant!
Step 1: Remove The Plant From The Pot

Start by carefully removing the snake plant from its pot. This should be done gently to avoid causing any damage to the fragile roots. You may need to turn the pot sideways or upside-down (while holding onto the base of the plant) and give it a few taps to help ease the plant out.
Once the plant is out, you’ll want to remove as much soil as possible from the roots. This can be done by gently shaking the plant and using your fingers to dislodge clumps of soil. The goal is to expose the rhizomes and roots, so you can see where the pups are connected.
Step 2: Identify The Rhizomes and Untangle The Roots
Once you’ve cleared the soil, you’ll be able to spot the rhizomes – these are the thick, root-like structures that run horizontally and from which the pups sprout. You’ll notice that each pup is connected to a rhizome.
Now comes the somewhat tricky part – untangling the roots. Try to be as gentle as possible while separating the roots. They don’t all need to be completely separated, but enough to isolate each pup along with its corresponding rhizome and roots.
Step 3: Cutting Through the Rhizome
Once you’ve untangled the roots and isolated each pup, it’s time to separate them from the mother plant.
The most important thing to keep in mind is that you DO NOT NEED to separate all of them! You may want to keep several together, or the shoot is too small to survive on its own, so those you don’t need to cut.
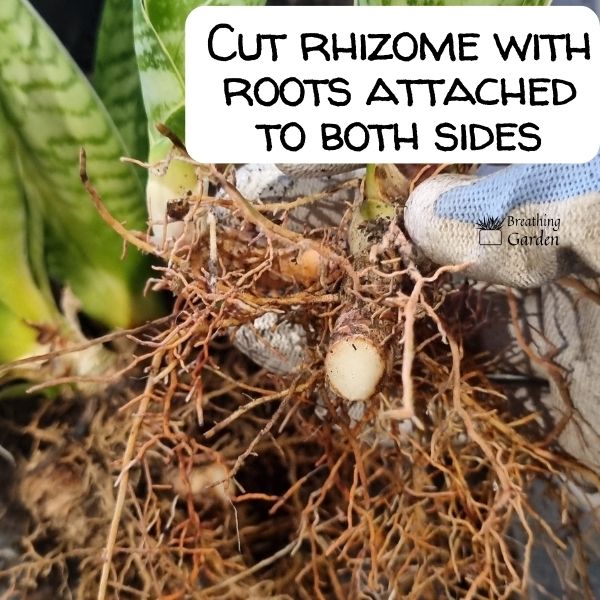
To cut through the rhizome, use a sharp, sterile knife to cleanly cut through the rhizome. Make sure your cutting tool is clean to prevent any bacterial infection.
Where to cut: cut on the rhizome between the base of the pup and the mother plant. The idea is to get as much root material attached to each pup as possible, so they can both survive on their own without any issues.
Step 4: Repotting Your Sansevieria Plants
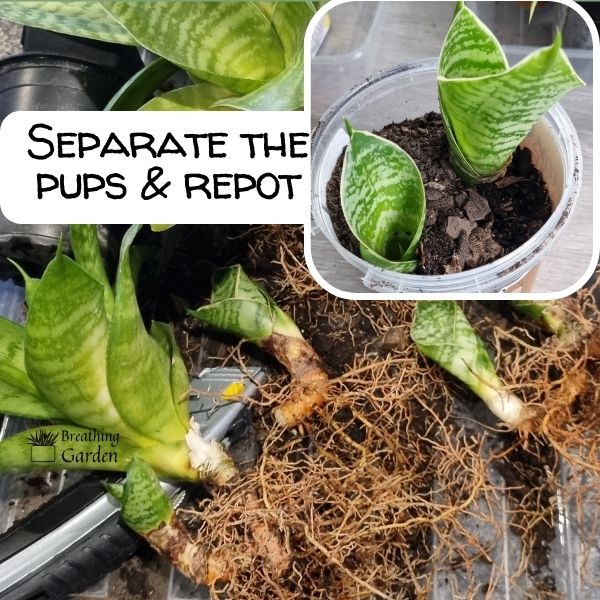
Once you’ve separated the pups from the mother plant, it’s time to repot them. Choose a pot that’s slightly larger than the size of the pup to allow for future growth. Fill the pot halfway with a well-draining soil mix, specifically formulated for succulents.
Place the pup in the center of the pot, and fill around it with more soil, ensuring that the rhizome is covered, but the leaves are above the soil line.
You can always plant multiple pups in the same pot. Just make sure to give each pup enough space to grow without crowding the others. Water the newly potted plants lightly and place them in a bright, warm location. Remember, patience is key when it comes to plant propagation.
Step 5: Find Each Plant A Good Home
After successfully repotting your snake plant pups, the next exciting part is finding a good home for them. Snake plants are versatile and can thrive in a variety of indoor environments – they are excellent additions to living rooms, bedrooms, or even offices.
Fill an entire wall with snake plants, have one in each room, or find them a new home. They make wonderful, thoughtful gifts for friends and family, or you can sell them, or give them away to others. Sharing your love for plants can be a rewarding experience, and who knows, you may inspire someone else to start their plant journey!
(The 2 I propagated are going to work for anyone who wants a new plant)
In Summary: Snake Plant New Shoots
In conclusion, separating snake plant pups from the main plant is a great way to give your main plant more space while propagating more plants.Remember, the key to a healthy snake plant is a well-draining environment, bright indirect light, and moderate watering. With these in mind, you’re well on your way to creating a thriving indoor jungle. Good luck and happy planting!
